Getting Started
Pre-requisites
- Experience building iOS Applications
- Latest version of Ruby (comes with XCode)
- Latest Supported XCode Installed (8.3)
- Please do not attempt to integrate LiquidPlatformKit into beta versions of XCode as this most likely will not work or cause unpredictable results
- A Liquid Community set up with credentials that you can use to log in
Begin by creating an XCode project like any other way. Since LiquidPlatformKit is the underlying framework to help you interact with the data, there is no limitation on how you develop your iOS Application. For the demo application we are providing, we will use the project name: HelloWorldPlatform When you're ready to start integrating with LiquidPlatformKit, bring up a terminal screen.
https://github.com/LiquidAnalytics/ld-api-examples/tree/master/ios
(For sample credentials to the application, please contact your Liquid Analytics rep)
Cocoapods
First you'll need to install COCOAPODS. Cocoapods is essentially a library manager for all the dependencies that LiquidPlatformKit has. You can do this by simply typing: (Note if you have an existing version of cocopods higher than 0.39.0, you'll have to uninstall that first
sudo gem install cocoapods -v 0.39.0
Note, for now we only support this version of cocoapods (or older) If you have v1.0 or older, you'll have to downgrade for now, we are making an effort to support 1.0 as soon as possible.
If you get any sort of error, you'll want to make sure you have the latest version of Ruby installed first. After you've installed pods, use the terminal and navigate to the location of your XCode project. Now type:
pod init
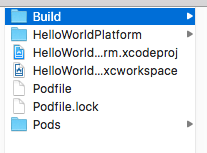
If everything went accordingly to plan, your project directory should now look similar to this.
Now open up the Podfile in your favorite text editor and copy and paste the text below. (Reference: http://blog.cocoapods.org/Sharding/)
source "https://github.com/CocoaPods/Old-Specs"
platform :ios, "10.0"
use_frameworks!

pod 'Reachability', "=3.1.1"
pod 'ASIHTTPRequest', "=1.8.1"
pod 'FMDB', '=2.4'
pod 'MTLocation', '=0.9'
pod 'BlocksKit', '=2.2.5'
pod 'SSPullToRefresh', '=1.2.0'
pod 'DTCoreText', '=1.6.9'
pod 'CorePlot', '=1.6'
pod 'DraggableCollectionView', '=0.1'
pod 'RBBAnimation', '0.3.0'
pod 'SDCAutoLayout', '2.0'
pod 'PLCrashReporter', '=1.2-rc4'
pod 'yajl-objc'
pod 'PEGKit', '~> 0.4'
pod 'CocoaLumberjack', '=2.1.0-beta'
pod '1PasswordExtension', '~> 1.6'

link_with 'HelloWorldPlatform'
#replace HelloWorldPlatform with your own project name
Save the file and return back to the terminal. Now type:
pod install --no-repo-update
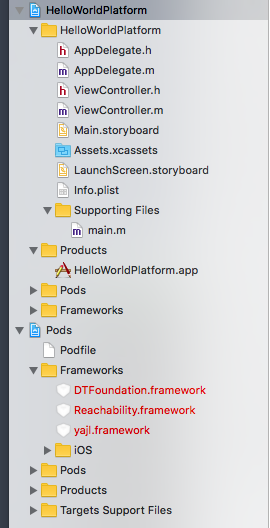
Pods will now automatically go retrieve the dependencies you've specified and place everything in a Pods.xproj for you. It will also transform the project you created into a workspace ( a collection a projects). Close XCode, and now using your finder, find the .xcworkspace equivalent of the project and open that. Your workspace should now look something like this.
(If you're having trouble, you can go here: https://guides.cocoapods.org/using/using-cocoapods.html)
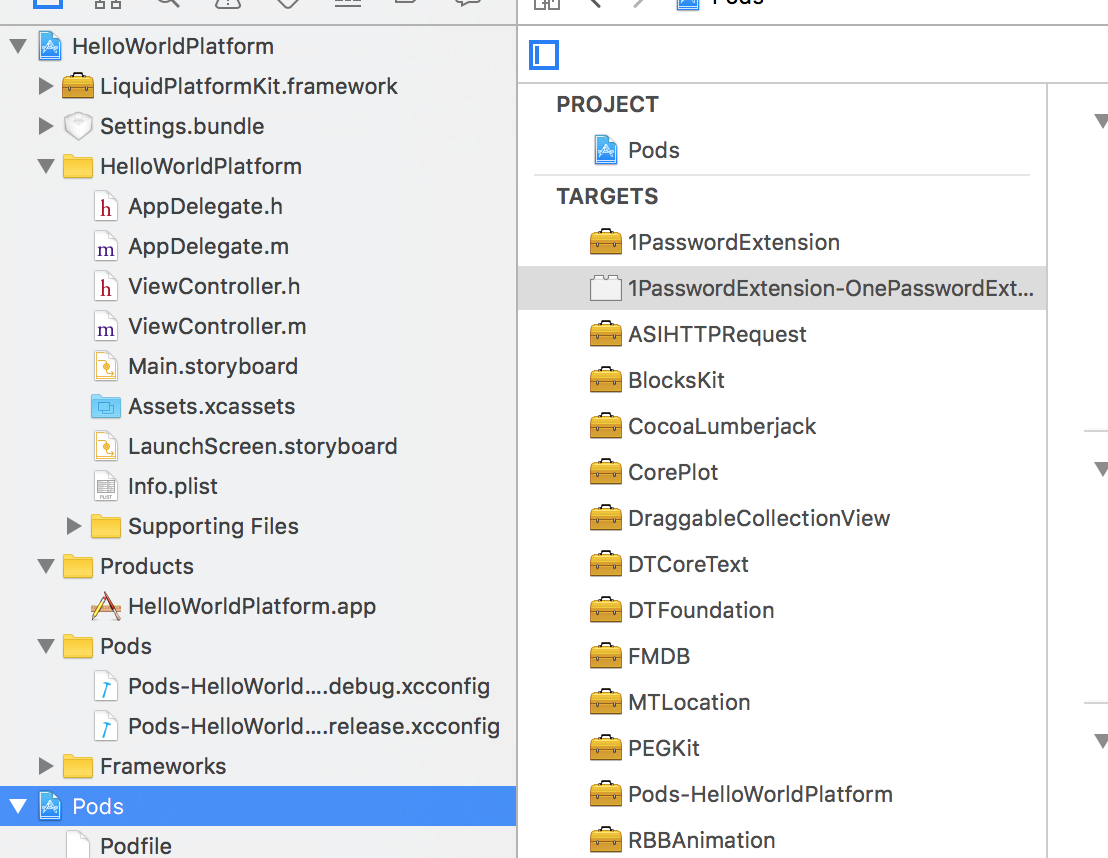
Upon first building the workspace, you're going to get an error about onepassword, to fix this, choose the pods project, onepassword project, and re choose the same info.plist
When you try to build your workspace, it's going to complain about a file, YajlDocument.h
Open up that file, and look for the following:
__weak  NSMutableDictionary *dict_; // weak; if map in progress, points to the current map
__weak  NSMutableArray *array_; // weak; If array in progress, points the current array
__weak  NSString *key_; // weak; If map in progress, points to current key
Remove the __weak keyword and continue on.
You also have to make a fix to 1PasswordExtensions. Select the pods project and then the OnePassword-OnePasswordExtensionResources file and manually select the info.plist.

Adding LiquidPlatformKit.framework
We made adding LiquidPlatformKit.framework as simple as we possibly could. Simply drag it into the project that you created. For the tutorial, I've placed it in a folder called Frameworks.
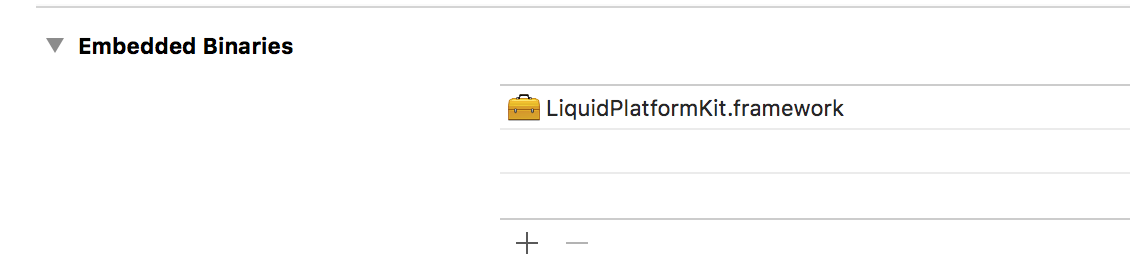
Click on your project in the project navigator, and then click on your target. Under General look for embedded binaries. Add LiquidPlatformKit.framework there.
Next, go to build settings, find "Allow Non-Modular Includes in Framework Modules" and set to YES.

In the same section, find "Always Embed Swift Standard libraries" and set to YES.

Finally you need to set Enable Bitcode to NO

Adding Host
We'll need to define a host name first for the Liquid server endpoint. We do this at the settings.bundle/Root.plist level (Depending on how you created the project, you may need to add a settings bundle).
<dict>
            <key>Type</key>
            <string>PSTextFieldSpecifier</string>
            <key>DefaultValue</key>
            <string>https://ldcloud-dev.liquidanalytics.com</string>
            <key>Title</key>
            <string>Hostname</string>
            <key>KeyboardType</key>
            <string>URL</string>
            <key>Key</key>
            <string>seasideServerHost</string>
        </dict>
        <dict>
            <key>Type</key>
            <string>PSTextFieldSpecifier</string>
            <key>Title</key>
            <string>Port</string>
            <key>DefaultValue</key>
            <string>443</string>
            <key>KeyboardType</key>
            <string>NumbersAndPunctuation</string>
            <key>Key</key>
            <string>seasideServerPort</string>
        </dict>
Important Methods
Before you can use any of the code, you'll have to import the LiquidPlatformKit header, to do so, use the code below:
#import <LiquidPlatformKit/LiquidPlatformKit.h>
There are a few spots where you'll need to write a lines of code in order to get started. Using HelloWorldPlatform as an example, notice in the AppDelegate class, didFinishLaunchingWithOptions method we've done two things.
[[LDCLogging sharedInstance] setupLogging:@"Starting LDCLogging" dbWriter:[LDCDBSeasideLogWriter sharedInstance]];
    if (![[LDMDataManager sharedInstance] openDatabaseWithName:@"HelloWorldLiquid"]) {
        NSLog(@"CRITICAL! Database could not be opened!");
        return NO;
    }
The first segment of code starts logging. The second line of code opens the DB for processing. In general this should be done on your main view controller in the background thread, with some type of loading screen. But for your first applicationi and getting the initial framework to compile and run, this will be fine.
Registering And Logging In
In order to start interacting with your community, you'll first need to login and obtain a login token. Every transaction for here on forwards relies on this token. If the community is set to expire the token after a specific period of time, the proper methods need to be implemented so that you know to ask the user for a new token. To do this your login view controller must implement LSCSeasideApplicationDelegate. Specifically the following methods:
- (void)updateLoginStatusLabel:(NSString *)status enable:(BOOL)enable
- (void) authenticateWithMessage:(NSString *)message userEditable:(BOOL)userEditable providePasscode:(BOOL)providePasscode callback:(void (^)(NSString *username, NSString *password))callback;
- (void) registeringWithMessage:(NSString *)message syncingData:(BOOL)syncingData syncProgress:(float)syncProgress
- (void) selectCommunity
- (void) registered
Also make sure to add this code to the beginning of the viewDidLoad method in your login view controller.
    [[LDMDataManager sharedInstance] executeAsynch:^{
        [[LSCSyncController sharedInstance] startWithDelegate:self];
    }];
When the login controller class has everything implemented, you can add this the actual login method.
   [[LDMDataManager sharedInstance] executeAsynch:^{
        self.authCallback(username, password);
    }];
The method above will start off the login process and the rest of the callbacks will be handled accordingly. When you are logged in and the data has been given to you, the registered method will be called. There is some basic code in place for HelloWorldPlatform just to show you that some data has been synced, you should now have everything you need to get started.