How to Deliver a Liquid Solution
The Whole Nine Yards
This chapter will serve as a true starting point for anyone who wishes to understand the entire process of integrating Liquid Platform. Like any good architect, knowing the right question is half the battle. We'll try to give you a head start with the ones we often face.
Pre-Planning
What Do I Want To Do?
It's hard to get more obvious than that, but an important question to answer, at the highest level possible. The details aren't required quite yet, since you won't know the answers right away. A high level summary is all that is needed. For example: I want to build an application on the iPad that will place orders. Most of the relevant data lives in SAP today, and SAP will need to process all the orders". Having everyone agreeing on the high level idea will help us with the next few steps: Consider the following:
- What kind of application are you trying to build?
- iOS, Andoird, Web, Hybrid?
- Make a list of all the systems involved
- Where is the data today? e.g: Hana, SAP, Oracle DB, or a mix?
- Do I need round trip with SAP, or is this just data extraction?
- Determine the system of record for each major use case
- e.g: Orders reside in SAP, but Accounts and Products live in Hana. Conversion factors are calculated live daily on a Microsft SQL DB.
- Will Liquid be a system of record for anything?
Role Assignment
With the high level questions answered, we'll need to identify the major roles, each having its unique skill set requirement.
- Back End Specialists
- Understands the data model and related components for their back end system
- Integration Developers
- Responsible for gathering back end data and sending it to Liquid Server
- Systems Architect
- Responsible for understanding how each system interacts with one another
- Works with back-end specialists and integration developers
- Sets sizing requirements performance benchmarks
- Application Developer
- Responsible for developing the front end application that uses Liquid Core API.
Create The Data Model
There's no need to solve the problem of how to get the data out of the system of record into Liquid quite yet. That will come a bit later. So let's assume right now there is a magic button that puts everything in the Liquid system just the way you want it. Let's determine just exactly what we want.
The Liquid system works in relation to items. Consider the following examples:
- User
- userId (pk), userName
User is an item type. Every user in the system is an item. Each user item must contain a userId since it's the primary key, and it may or may not contain a username. The standard Liquid data model is easily mappable to SAP entities and can be easily extended to fit each customers unique requirements. Now let's take at the diagram below.
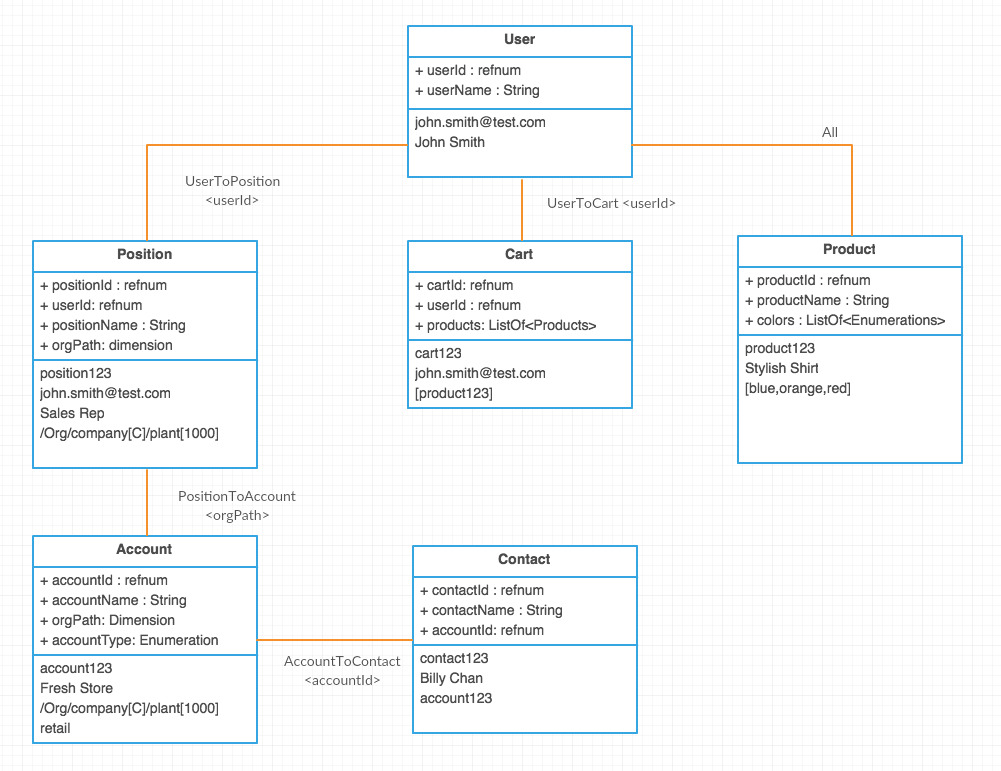
Let's list out the entities and how they are entitled to the User.
- User
- Each user is automatically entitled the item with their own userId
- Position
- Users can have multiple positions (connected via userId)
- Account
- What accounts a user sees is determined by what positions they are entitled to (joined via the orgPath
- In the example above, we are saying accounts are grouped by plants, and the plant assigned to the user in their position dictates who they can sell to
- Contact
- An individual contact person for each account. Accounts can have multiple contacts, but each contact is referenced to their associated account via the accountId
- Products
- Every user sees all products
- Carts
- Only the user that created the cart can see the cart
Each blue box is a schema, with the top half of the box representing a field on the schema. The bottom half of the box is sample data. Each orange line connecting the entities outline how they are connected. In this case, each connection is presented through a relationship, with the angular brackets indicating the primary key used. Here is a code example of the two schemas User, Position, along with the UserToPosition relationship.
SCHEMAS
{
  "type": "User",
  "supportedOperations": [
    "Create",
    "Update"
  ],
  "fields": [
    {
      "name": "userId",
      "dataType": "refnum"
      "primary": true
    },
    {
      "name": "userName"
    },
  ],
  "category": "org"
}
{
  "type": "Position",
  "supportedOperations": [
    "Create",
    "Update"
  ],
  "fields": [
    {
      "name": "positionId",
      "dataType": "refnum"
      "primary": true
    },
    {
      "name": "positionName"
    },
    {
      "dataType": "dimension",
      "name": "positionType",
      "dimensionType": "/Org/positionType",
      "dimensionLevel": "/People/positionType"
    }
  ],
  "category": "org"
}
RELATIONSHIP
{
  "name": "UserToPosition",
  "fromType": "User",
  "fromField": [
    "userId"
  ],
  "toType": "Position",
  "toField": [
    "userId"
  ]
}
The example above is important to understand because it provides the first set of entitlements. Entitlements answers the question of who gets to see what data. How we set up the paths is covered in detail in this section here. This concept is important to understand now because it will affect how many item types you have, what fields they have, and how they are connected. Schemas / relationships are created and managed using Mission Control. For more details on the example above in an existing community, please see the Case Study.
Community Setup
Now that we understand (on paper), where the data lives today, and how that data should be mapped into the Liquid system, it's time to start to setup the infrastructure piece. The main questions of concern at this point focus around two words: performance and scalability
Consider the following questions:
- How many users will be using the application?
- How many licenses will the customer need to purchase
- What number will this grow to in what period of time?
- How many items does this need to store?
- How many accounts / products are in the system?
- How many orders will users generate per day?
Answering the questions above will help you size the community properly and set up the database instance such that optimal performance achieved given the parameters above. It will also give you the ability to provide an accurate infrastructure cost to the customer.
For your next steps:
- Create a community in dev for your customer
- Setup users (service accounts and other admins)
- Setup Mission Control roles
- Setup schemas / relationships / entitlement paths
Usually after this step, application development and data integration start at a parallel path. With the data model correctly setup, data analysts can start manually putting data through manually uploading data (Liquid Supports bulk json upload, or csv spreadsheets). With sample data in the system, application developers can use the REST API to obtain data and start developing the user interface. For the purpose of this guide, we will go in a linear fashion to extra data out of our source system.
Getting Data For The First Time
Let's have a quick recap of where we are at this point of the project.
- Liquid Dev instance is up and ready to accept data
- Data model is defined (by schemas and relationships)
- App Developers are possibly starting in parallel, working with sample data
For the integration developer, this will be the bulk of the work. First, it's important to understand that Liquid Platform Services offers a fully standard REST API. This means:
- The customer controls when data enters the Liquid system and when data leaves the liquid system (i.e POST / Delete whenever they want )
- If the data lives in SAP, customers can use the JCO connector to retrieve data, and POST data to the Liquid system, performing any business logic in between
- If the data lives on some intermediate database, the customers can retrieve it in any shape or form they wish, and POST it to the Liquid system when ready.
- When the data needs to be modified, they can a MERGE, or DELETE when they want to remove it.
A customer who pushes data, and sends delete requests on their own schedule will enjoy consolidating all of their data in one single place while treating the Liquid system almost like a "black box". Please see here for coding examples on how to send data to liquid. Link Needed
Unfortunately, extracting information from various legacy system is far from trivial. For various business / political reasons, or simply legacy technical reasons, it may be impossible to push data to the Liquid system. Often times, a custom connector needs to be written for each customer to pull data out of a large back end system (such as SAP). More details and coding guidelines for work on LES can be found here. Link Needed
When writing a custom connector, consider the following:
- Is there an existing technology solution in place to help reduce the development time? (e.g: Mulesoft templates)
- If pulling data, what is the schedule for each job? Consider staggering jobs and all dependencies
Liquid Platform Services are all offered out of the Amazon Workspace. So in order to connect to any back end system in an enterprise environment, that system needs to be able to connect to AWS. Refer to here for a guide on connecting to AWS. Link needed
Writing Your Own Application
Liquid Platform Services is exposed on a fully standard RESTful API. Web application developers can get started immediately after a user has been set up to start retrieving data.
For web developers, please see this section on examples on how to read / create data from the Liquid Server. For iOS developer, this book gives provides an indepth walkthrough of how to integrate Liquid Core API into your new or existing iOS application. That section can be found here. Link Needed.
Going Between Environments
After you have everything up and running in Dev, it's time to graduate to QA and Prod. The details of this are documented in Package Management. Link Required In Summary:
- Create a community in the desired envirnoment
- Must be named exactly the same in order for package management to work
- Remember that QA and Prod (should) be significantly different than Dev in terms of sizing. The size will affect price, so work with your Systems archtiect to come up with the necessary sizing specifications.
- Set up your users
- invite people to the community, and assign MC roles
- In Mission Control (Dev), edit the community configuration file for the two sections
- Complete Config
- Any item type listed in this section will be completely copied over when the package is created and deployed to the desired environment accordingly
- This is best used for configuration items since they must be idential across all environments
- Update Config
- Any item type listed in this section will be copied over, if the individual item has configData set to true.
- This is best used for things that may change between environments, such as enumerations
- Create your package under the Package Management tab
- Go to MC in the environment you wish to deploy the package
- Go to the Package Management tab, select your package and deploy
- Look at the "In Progress" tab to monitor
- Complete Config
Support And Debugging
Mission Control is the best place to start for all levels of debugging and support. It supports:
- Item Transaction History
- Keep track of who made what change to an item, including deletion
- Revert to previous item revision
- Device Logs
- See exactly what the device sent you and when (up to 30 days in production)
- Real Time Function Call Log
- Make real time calls to back end services without application code
More information on this section can be found in detail in Device Management